Scan with raspberry pi, convert with aws lambda to searchable PDF
I have long dreamed for a setup which lets me just press the scan button on my scanner and — without any further input — uploads it as a searchable PDF onto some cloud drive. Thanks to the good support of scanners by SANE and the ease of use of AWS lambda it’s actually quite easy (judging to the length of this post it looks like quite a task, but in the end it is straightforwards and is — surprisingly — quite free of hacks).
In this solution you:
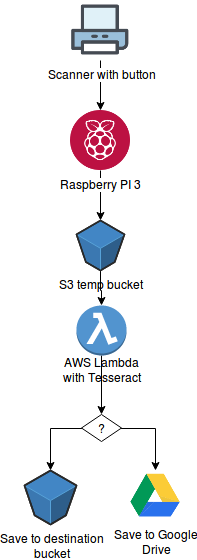
- set up SANE on your raspberry pi 3 so it scans your document
- set up scanbd to detect the scan button
- set up a S3 bucket for uploading
- set up a lambda function which uses tesseract to create a searchable PDF
- (optionally) set up google api to store the PDF to google drive
What you need:
- Raspberry Pi 3 (I guess the other models serve equally well)
- Paper scanner with a “scan” button which is supported by saned
- an AWS account
Personally I’m using Raspbian Stretch Lite as OS on my Raspberry and a Fujitsu S1300i.
Before you start: you might just want to wipe your pi and start fresh. Takes you about 15 minutes extra, you can follow my howto so you can do that headless (without attaching monitor/keyboard to the pi).
Set up SANE
First I tried to compile SANE from source, believing that this is the only way to get my scanner to work. After hours of trying and simplifying this howto (And after I wiped the pi3 two times to start over!) I figured out that apt install works just fine! So bear in mind that this howto was done with sweat and after hours of painful try-and-error :)
Just install:
sudo apt install sane-utils -y
No need to install the whole sane package which comes with 162 packages needing 430MB of space (sic!). sane-utils is enough. Now, when you plug your scanner to your pi and do..
sudo sane-find-scanner -q
.. you should see something like this:
found USB scanner (vendor=0x04c6 [FUJITSU], product=0x128d [ScanSnap S1300i]) at libusb:001:011
found USB scanner (vendor=0x0424, product=0xec00) at libusb:001:003
That is, your scanner is already detected by sane. Now, throughout this howto, I’ll use user pi to run the processes. You can choose to go for another user, but please don’t use root for it.
To give your user pi the permission to scan you’d do:
sudo usermod -a -G scanner pi
This works because the group scanner is configured in /etc/udev/rules.d/*.conf to access the scanner.
You still cannot scan though, because you need to install the firmware file for your scanner. First, find out where the firmware needs to sit: Grep for your model (in my case scansnap 1300i):
grep 1300i /etc/sane.d/*.conf
Shows you something like:
/etc/sane.d/epjitsu.conf:# Fujitsu S1300i
/etc/sane.d/epjitsu.conf:firmware /usr/share/sane/epjitsu/1300i_0D12.nal
So all you’d need to do is get this 1300i_0D12.nal file. Get it from installation files (i.e. that old CD rom), or just google for your firmware file and hope that there’s no security concerns.. In my case I found it on github and installed it with:
sudo mkdir -p /usr/share/sane/epjitsu/
sudo wget https://github.com/ckunte/sfware/raw/master/1300i_0D12.nal -O /usr/share/sane/epjitsu/1300i_0D12.nal
Now you should be able to insert a document into the scanner and ..
scanimage >/tmp/out.pnm
.. should produce a nice PNM file ready to be further processed.
If this doesn’t work..
Check if sudo scanimage -L works. If this does, then there is a permission problem with your user pi.
- Check if you have conf files in
/etc/udev/rules.d. If not, then restart (yes..!) your raspberry pi. - For more debugging check this guide.
Set up scanbd
Scanbd is very badly documented. This is sad, because once you get it working, it’s doing its job very well. Plus: there’s really no alternative to scanbd.
Scanbd is just a daemon which regularly polls the scanner to see if a button was pressed. If it was, it just starts a shell script which itself then uses sane to scan. I found this stackoverflow answer a good explanation how scanbd works.
There are a few howtos on the web which are overly complicated (i.e. copying all files of sane to scanbd), after 2-3 fresh installs I found out a quite forward way to get it working.
Fist, install it via
sudo apt install scanbd -y
then, edit /etc/scanbd/scanbd.conf and set (if your scanbd.conf is missing — as it was missing for me on the first try — take this conf file as a start):
debug-level = 7: to see errors more easily while setting upuser = pi: to run script and the scanning process as userpi
Start scanbd with
sudo scanbd -f
and you’d see that scanbd is polling. When you hit the scan button, then you should see output lines of scanbd trying to run /etc/scanbd/scripts/test.script which doesn’t exist. So far, so good!
Next, put your own script into place: Edit /etc/scanbd/scanbd.conf and set:
scriptdir=/etc/scanbd/scripts- in
action scan:desc = "Scan to file and upload to s3"script = "scan.sh"
Then put this sample script into /etc/scanbd/scripts/scan.sh:
sudo mkdir /etc/scanbd/scripts/
echo -e '#!/bin/sh\nscanimage > /tmp/foo.pnm' | sudo tee /etc/scanbd/scripts/scan.sh
sudo chmod a+x /etc/scanbd/scripts/scan.sh
Replug your scanner and test it with:
sudo scanbd -f

Hitting the scanner button should scan. Buuut: if you now power off the scanner (close the lid on my model) or unplug it or whatever, and then replug it, then scanbd crashes spectacularly with a segmentation fault. There is this reported bug which is solved with version 1.5.1, but instead of compiling from source it’s easier to start it over systemd and tell it to restart the service after crash:
First, edit /lib/systemd/system/scanbd.service and in the [Service] section add the line Restart=on-failure.
Then, reload systemd and tell it to start the service on boot time:
sudo systemctl daemon-reload
sudo service scanbd start
sudo update-rc.d scanbd enable
Now, hitting the scanner button should work out of the box. Also try restarting the pi and replugging your scanner. You also may want to have a look at syslog, where all scanbds messages end up: tail -f /var/log/syslog
If, for any reasons your service would just not start, then examine /lib/systemd/system/scanbd.service and check if ExecStart references your scanbd (use which scanbd) and your scanbd.conf, and also that SANE_CONFIG_DIR is set correctly.
Upload to S3
The idea is to offload as much computing as possible into the cloud. In theory you could also just run tesseract on your pi and then store it somewhere, but first I wanted to free up the pi as fast as possible for the next scan and second I was just searching for another excuse to try out lambda..
So in the next step we’ll alter the script so it uploads to s3. But before we can do that we’ll need to create a user on AWS which has just enough rights to do that.
AWS: add bucket and user

- S3: Create a temporary upload bucket e.g.
temporary-upload(be sure to choose a region close to you. Upload speed is a lot faster for closer regions). Note the ARN of the bucket. - IAM: create a policy
ReadWriteOCR, switch into JSON editor and paste this (replace the arns):
{
  "Version": "2012-10-17",
  "Statement": [
    {
      "Effect": "Allow",
      "Action": ["s3:ListBucket"],
      "Resource": ["arn:aws:s3:::<temporary-upload-bucket>"]
    },
    {
      "Effect": "Allow",
      "Action": [
        "s3:GetObject",
        "s3:PutObject",
        "s3:DeleteObject"
      ],
      "Resource": ["arn:aws:s3:::<temporary-upload-bucket>/*"]
    },
    {
      "Effect": "Allow",
      "Action": [
        "logs:CreateLogGroup",
        "logs:CreateLogStream",
        "logs:PutLogEvents"
      ],
      "Resource": "arn:aws:logs:*:*:*"
    }
  ]
}
- IAM: Create a user with programmatic access only and attach the
ReadWriteOCRpolicy. Download the csv which contains the key and secret of this user
Now, this policy has a little too much right for just uploading the files from your pi, but that way we can reuse the policy for the lambda function later and we don’t need to create two policies.
Back on Raspberry, first install and configure aws cli (use the key and secret from the downloaded csv):
sudo apt install python-pip -y
sudo pip install awscli
aws configure
It’s important that you start aws configure as the user with which you run your script (i.e. user pi).
Now, test that s3 access works:
aws s3 ls s3://<temporary-upload-bucket>/
aws s3 cp some_file.txt s3://<temporary-upload-bucket>/
Write the scanner script
Now – finally – all the things are in place to finish the scanner script.
The below script..
- scans in batch mode: creates multiple files until the feeder is empty
- does a duplex scan (there’s no detection if both sides contain content. It means that if it’s a one sided paper the second page is just empty)
- scan with
resolution 300: this is the default. It is a pretty fast scan and the quality is just what OCR (tesseract) recommends - does a
.tar.gzarchive. I did some speed tests and in my case it was quicker to first gzip the file before uploading. But that greatly depends on your upload speed - does the compression and uploading in the background so the scanner is ready to do the next scan
Take the script and save it in /etc/scanbd/scripts/scan.sh, the only thing you’d need to adapt is the s3 bucket name. You may also comment out the rm -rf in the second last line until you’re sure your lambda function doesn’t eat up your files)
#!/bin/sh

set -e
export TMP_DIR=`mktemp -d`

echo 'scanning..'
scanimage --resolution 300 --batch="$TMP_DIR/scan_%03d.pnm" --format=pnm --mode Gray --source "ADF Duplex"

echo 'packaging and uploading in subshell'
(tarname=scan_$(date "+%Y-%m-%d_%H%M%S").tar.gz
cd $TMP_DIR
tar -czf $tarname *.pnm
echo 'uploading..'
aws s3 cp $TMP_DIR/$tarname s3://<temporary-upload-bucket>/
rm -rf $TMP_DIR
echo 'done') &
Now, pressing the button on your scanner should upload the file to s3.. whohoo!
If everything works then you can set debug-level=3 in /etc/scandb/scanbd.conf so it does less verbose logging into syslog.
Set up AWS lambda

Now to the second part – the one I was looking forward the most: create a lambda function which triggers automatically once the raw scan files are uploaded on s3. Once the trigger fires, it will
- start a lambda instance
- download and unpack the
tar.gzfile from the temp bucket - run tesseract with pdf output, remove empty pages
- upload the OCRed pdf to S3 or google drive
- delete the tar.gz file from the temp bucket
To cut this howto a little short I created a ready made zip file which contains the lambda function. You can have a look at it but it’s not particularly beautiful. It’s mainly just a wrapper around calling the tesseract binaries. The tesseract binaries are built on an EC2 host which is the same execution environment as is used for AWS lambda.
You could go ahead and fork that git repo and adapt it. In this guide we’ll just use it as-is:
- Download
ocr-lambda.zipfrom the release page - Upload the zip file into an s3 bucket of your choice (the bucket needs to be in the same region you want your lambda function to run in)
Now, set up a lambda function with:
Name: e.g.scan-ocrRuntime:Python 3.6Role:Choose an existing roleExisting role: the role you created earlier:ReadWriteOCR
Then, in the lambda function set
- Function code:
Handler=handler.handler - Environment variables:
S3_DEST_BUCKET=<ocr-document-bucket>Destination bucket name where lambda will upload the OCRed pdfEMPTY_PAGE_THRESHOLD=200if tesseract finds less than 200 characters on a page it’s — from experience — likely to be empty and will be removed (assumes you’re using a duplex scanner). If you want to disable empty page removal, just put this to 0UPLOAD_TYPE:discard: just to get going for now, the OCRed file will be discarded. Later on you’ll configure this lambda function to upload to S3 or Google Drive.
- Basic settings:
- Description: e.g.
take tar.gz and turn it into OCRed PDF Timeout:5:00minutes: This is the max value which lambda allows. For 6 page scans my lambda needed about 12s, so with 5 minutes you should be fine handling ~150 pages :)Memory: I chose 2048MB. The more memory you take, the faster the execution time (see also the official doc). 128MB is not enough. It will lead to out of memory exceptions.
- Description: e.g.
Now, load in the zip file you just uploaded to s3:
- Function code:
Code entry type:upload from s3S3 link URL: the zip file location in the formhttps://s3.<region>.amazonaws.com/<bucket>/ocr-lambda.zip
Test it

In theory this all would work out of the box of course. But let’s try it out. Upload a tar.gz from a test scan to your temporary s3 bucket. Then, hit configure test event from the dropdown at the top of your lambda function. Now, put this json into the editor:
{
  "Records": [
    {
      "s3": {
        "bucket": {
          "name": "<temporary-upload-bucket>"
        },
        "object": {
          "key": "<uploaded-file>.tar.gz"
        }
      }
    }
  ]
}
After saving the test you can run it and you’ll see all the text output of the lambda function, and hopefully the line all fine, discarding file, but not deleting source file.
Upload to S3 / Google Drive
Originally I just had the lambda function upload the file to S3 and hoped to find a nice frontend above S3 (but failed. Apparently there’s nothing really decent), but then I realized that I’d need some text search anyway. Otherwise, half the fun of OCR (apart from copy-pasting lines from invoices into my ebanking, which is my main use case) is gone anyway, I decided to go for Google Drive support.
{
  "Effect": "Allow",
  "Action": [
    "s3:PutObject"
  ],
  "Resource": ["arn:aws:s3:::<dest-bucket>/*"]
}
Then, proceed to the last section to add the lambda trigger.

First, follow through steps a-h in this documentation. This makes you enable gdrive on your google api account. In the end you’ll end up with a client_secret.json file.
Now, git clone the ocr-scanner repo you already used for downloading the zip release file and trigger the oauth flow:
git clone https://github.com/philippkeller/lambda-scanner-ocr.git
cd lambda-scanner-ocr
pip install oauth2client
python scripts/get_drive_credentials.py
Your browser should open and asks if you’d like to authenticate your lambda function to go over your google api account and created files in your google drive and access the files it created (which it won’t need). See here for more details about the right you’re granting.
Once you grant the right, you’ll see a bunch of environment variables you need to copy-paste over to your lambda function.
Optionally, if you wish your PDFs to be stored in a specific folder, go to that folder in your google drive, copy the part in the url after /folders/ and put that into an additional environment variabled named GDRIVE_FOLDER
Add trigger
Now, to the very very last thing: Your lambda function should auto-trigger once your raspberry pi3 uploads a file into your temporary s3 bucket. First, reload the page of your lambda function, then, from the Add triggers menu of your lambda function (top left) choose S3, then in Configure trigger dialogue:
Bucket: the bucket where the lambda function should listen toEvent tpye:Object Created (All)PrefixandSuffixyou can leave empty
That’s it! Now, pressing your button on your scanner should make the whole chain reaction start and you should see your OCRed file in Google Drive (or S3, if you chose so). If it does not, you should be able to go to the Monitoring “tab” top of your lambda function and see if it triggered at all and head over to its log file.
Comments